Pages

Wednesday 13 March 2013

Tag Tutorial - FTU - Box of Gorjussness


SUPPLIES NEEDED

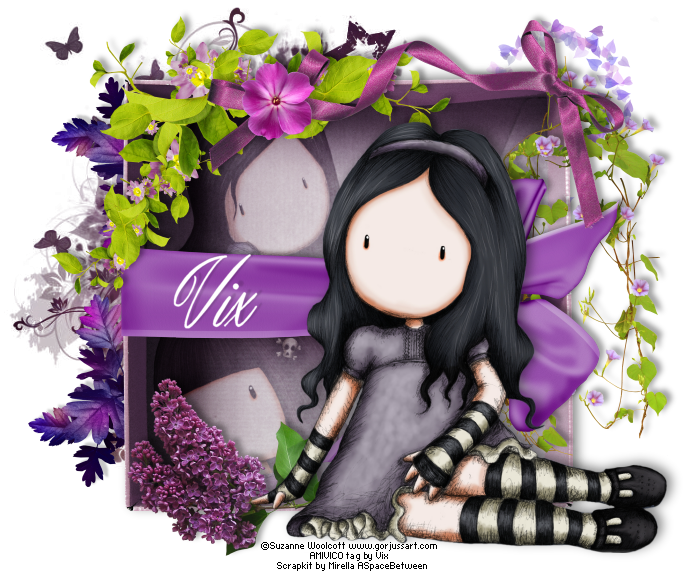
Tubes/Close Ups of your Choice - I'm using some tubes by Suzanne Woolcott aka Gorjuss who as of 14th March 2013 will no longer be selling tubes.
Thank you for all the gorgeous goodies over the years, Suzanne and best wishes with the new adventures!
My license to use these particular tubes is from the now closed AMI - so if you don't have these or any of Suzanne's work, then use a different set of tubes instead.

Scrapkit - I'm using an amazing freebie scrapkit called "Because of You" by Mirella @ A Space Between HERE
I love this kit, it is superb so when you download it, please take a moment to leave some love for the fab creator - thank you xx

Mask of Choice - I'm using my own mask called Vix_Mask363 which can be found amongst my older masks at my tutorial site HERE

No Filters Required - this is a real copy and paste tut...yeah!
BUT! Not that slap dash yannow :p
You'll need some experience of using the Selection Tool for this tutorial,
so not really one for tagging beginners - some tag experience, using layers and selections knowledge is desirable :)

Font of your Choice - I'm using Masterics Personal Use font

________________________

Open a New Image in PSP - 700 x 600 pixels
Add a New Layer
Floodfill White

Open Element25 - the Box Shelves
Resize 25%
C&P
Place to the centre left of the tag canvas

Open Element 15 - the leaves and flowers
Image, Resize 20%
C&P
Place as mine top left of the tag canvas

Open Element 16 - the dangling leaves and flowers
Resize as before, C&P and place top right

Open Element 24 - the bi-coloured leaves branch
Resize as before etc etc and place on the bottom of the box
Image
Flip
Image
Mirror
Place as mine on the left side of the box
and move this element layer below the box layer in the LP

Duplicate
Image
Flip
and move this 2nd leaves layer up the tag area and place lined up as mine with
the gap in the leaves and flowers

I'm not going to keep saying C&P, you know that by now lol!
So, from here on in, just assume that when I've said Resize, the next thing you do is to Copy and Paste the resized element
Marvellous!
OK then

Open Element29 - the lilac
Resize at 10%
Place as mine on the tag canvas
and move to line up with the bottom edge of the box

Open Element 26 - the faded leaves swirl brushy element
Resize 15%
Place as mine on the top right area of the tag and line up as I've done
Move down the LP so it's just above the White Background

Open Element 7 - the bow ribbon
Resize 15%
Place lined up as mine

Open Element 5 - the pinky flower
Resize 3% - yup, that's 3%
Place as mine on the tag canvas above the ribbon layer in the LP

Open Element 45 - the ribbony bow
Resize 15%
Place on the tag canvas lining up the flat side on the left of the ribbon
with the left side of the box edge and slightly over it but not much lol!
- zoom in and drop the opacity of the ribbon layer if you need to see it better
Once lined up as liked, duplicate this ribbon layer
Move one of the layers down the LP so it's below the top left leaves and flowers element from right back at the beginning of the tut
And move the next one (if not already) so it's positioned beneath the top swirly purple ribbon layer in the LP but above most of the others
OK?
Now take your eraser tool on this top ribbon layer and erase the ribbon which covers the line of the leaves and flowers element
Happy with all the placements so far? Check against my tag to see if you've got an exact or close approximation -have you? Yaaaay! Excellent.

SO now - Right click on the box shelves element layer and choose View, Current Only
This is where we do something different to C&Ping only - oh yes!

Take your Selection Tool, you want it on Freehand Selection - Point to Point - Add
with a Feather of 3
Zoom in to about 200% so you can see better and you want to Select the top back section of
the box - don't include the sides or shelf area - you just want the back panel
I started at the top left and went along the top and down the side then back along the bottom and up to meet the start point. Go steady and use the box as your guide

OK?

Once selected, Selections, Load/Save Selections, SAVE Selection To Alpha Channel, Save then Selections None
Repeat this sequence for the bottom back panel of the box too and Save your 2nd selection, Selections None

Right then
Once you've done this, the choice is yours!
You can either paste lots of tubes within the 2 selection areas, or you can have a close up in both, same top or bottom or different (same artist and license though, o'course loL!)

OK, so let's do the top selection first
Selections, Load/Save Selection, Load Selection from Alpha Channel
Load
And there's your first selection once more
Fill the selected area with tube/tubes/close up of choice
Make sure these layers are just above the Box layer in the LP
Once happy with Placement, Selection, Invert and Hit Delete twice on each of your tubes layers
Selections None
Once you've done this - change the Blend Mode of your tube or tubes layer to Soft Light or similar

Repeat this step for the lower selection - when you go into Load Selection, use the drop down menu on the left and look for your 2nd Selection and load that one
Then repeat the last step/s
Once done and you're happy
Right Click on the Box layer in the LP once more and choose View, ALL

Happy with how everything is looking? Hope so!
Final touches....
Open Paper4 (or whichever you'd prefer)
Resize 15%
C&P (aaargh, I can't help it, it's a disease loL!)
Position this paper layer above all the others and then apply a favourite mask to it - I used my mask called Vix_Mask363
Apply your mask and move it just above the White Background in the LP - duplicate it if you want a stronger effect
Open a full bodied seated tube to compliment your other ones and place over on the rightish of your tag and then apply a good dropshadow of choice
I used
-3
5
45
15.84
Black
(you need these sorts of angles to not shadow underneath the tube which if it's seated, would look floaty and weird)
Apply this same shadow to the Box layer
To all the elements on the "front" of the box - apply the same shadow but change the last settings to Opacity 36 and Blur 7.92
For the elements behind the box - ie. the two branches on the left side
Same shadow but change the Opacity and Blur to 22 and 2.97
Don't shadow the Mask/s or the top right brush swirl layer

Finally -
Use a colour from your tag so far or White like me - and apply your name in a favourite font of choice and place it over the ribbon area to the left and apply the same shadow but change to 15.00 and 2.00

Add your artist copyright info, URL and any license needed along with your "Tag by..." etc
Crop the excess canvas
Delete the White Background Layer
Save as PNG
All done!
Thanks for looking and have fun trying xx

This tutorial was written on the 13th March 2013 by Vix
It is a tutorial written as I went along this morning
trying to come up with things which I've never done before and therefore
and any potential similarities to other tag tutorials that
may be available is wholly unintended, completely coincidental
and bleddy astonishing!
Any items supplied to use to create your own tag with this tutorial are supplied
in good faith - if I have used something not intended
for usage in this way, please contact me via email.
Any items created by me for the purposes of this tutorial MAY NOT be used in
any other tag tutorials or for PSP Supplies you create (wordart, brushes, masks, templates, kits)
Links to tube/scrap blogs or PTU tube sites are added either through necessity or creator courtesy,
and it is entirely up to the individual (ie. You!) if you choose to visit these sites and/or download/purchase from them.
Scraps used in my tutorials that I've obtained from PTU purchased scrap kits are NOT supplied
in my tutorials supplies.
This website is intended for educational/entertainment purposes only
NO linking to my tut examples, screen shots, files or graphics permitted
All of my tutorials are registered with TWI

Wednesday 6 March 2013

Tag Tutorial - PTU - Pink Patty


SUPPLIES NEEDED

Tube - I'm using Patty by Verymany which can be purchased from Scraps and the City HERE

Scrapkit - A fabulous kit by Bibi's Collection called Just Dance - you can purchase it HERE

Xero Graphics Greyscaler and Radiance

Font - Bebas Neue from HERE

Scripty Font of Choice

_________________

Open a New Image in PSP
700 pixels wide by 550 pixels high
Add a New Raster
Floodfill White

Open BIBIJUSTDANCE ELEM (4)
The flower trail swirl
Resize this element 70%
Copy and Paste as a New Layer on the tag canvas
Place horizontally in middle of the canvas if needed
then Image, Flip

Open BIBIJUSTDANCE ELEM (3)
The branch doodle swirl
Resize 40%
C&P
And place so the left start point of the doodle is by the large purple
flower within the previous layer - see my screenshot for guidance


Open BIBIJUSTDANCE ELEM (48)
The pink circle dots
Resize 80%
C&P
Line it up as mine - see screenshot


Making sure you're on the top layer of the Layer Palette
(ie. the pink circle dots are highlighted blue on the right)
Hide the White Background layer for the moment
Layers, Merge, Merge Visible
Unhide the White Background Layer
And using Move Tool, Move the merged layer up the tag canvas
making sure you don't touch the edge of the tag canvas
Then
Duplicate
Image
Flip
Image
Mirror

OK

Open BIBIJUSTDANCE ELEM (48) - the frames
Resize 80%
C&P
Make sure this layer is above the others in the LP
Place centrally to the tag
Then
Open BIBIJUSTDANCE PAPERS (12)
Resize the paper 15%
C&P
and place under the frame layer
Using whatever method you prefer - Magic Wand Selection, or Erase etc
Delete the paper outside of the framed area
I used Magic Wand Selection Delete with an Expand of 5
Then Invert and hit delete on the paper layer

Now, let's get the tube and close up placed so we can then concentrate
on the final element placements
Place your close up image in the left frame area on a new layer
Resize as prefered and then once more, do a Selection Delete to get rid
of the over-lapping image
Place your tube on the right side - I resized my tube 60%
Once placed as you'd like it
Duplicate the tube layer
On the top copy
Adjust, Blur, Gaussian Blur, 2.00
then
Xero Graphics - Greyscaler on the default settings
then
Xero Graphics - Radiance on the default settings
then
in the Layer Palette on this layer, change to Soft Light and drop the Opacity to 60
Now, activate the tube layer below this
by clicking on it
then right click and View, Current Only
then click on the Visibility Toggle (the eye with the no entry sign) on the
above Soft Light layer to unhide it
then on the main tube layer, right click once more and Layers, Merge Visible
Right click once more
View, All
Duplicate the tube layer
Move one just above the frame layer
and one just under it (above the paper)
Hide the top tube layer
Using Magic Wand Selection - select the inner frame area
Selections, Modify, Expand by 5
Selections, Invert
And take your Eraser tool on a hard strong setting and erase the bottom parts of the tube which stick out below the frame area
(ie. in this instance, the skirt and legs)
Once deleted, Selections None
Now unhide your Top tube layer
and repeat the erase of the skirt and legs area and any other areas that you'd like - I erased so the bow of the frame was showing "above" the tube and now, you'll see she's poking out of the frame - s'nice innit!
This will probably be the last time I explain this method so in future, refer back to this tutorial if you need a refresher (or, I'll probably pop it in the Glossary over on the right lol!)
(I've worked out that repeating myself over and over again is one of the things that puts me off tutorial writing - after 7 years it can be a little..well, samey lol!)
OK
Add a drop shadow to the bottom tube layer only
I used
4
-4
43
17.82
Black
Repeat the Duplicate, Blur, Xero Graphics etc method for the close up layer if liked - I did but I didn't drop the Opacity, kept it at 100
Apply a shadow to the bottom close up layer too

So then,
Crop your Canvas to 700 x 550
then
Image,
Canvas Size
and go up to 700 x 600 with a central placement
Now on the White Back layer
Floodfill once more with White


Open the BIBIJUSTDANCE ELEM (51)
The Winged Heart
Resize, 60%
Place under the frame and paper layers in the LP
Central to the tag area - see mine for line up placement

Open the BIBIJUSTDANCE ELEM (50)
The butterfly heart assortment
Resize 60%
C&P
Place as mine

Open the BIBIJUSTDANCE ELEM (58)
The pink rose
Resize, 40%
C&P
Place as mine

Open the BIBIJUSTDANCE ELEM (74)
The striped heart
Resize 60%
C&P
Place as mine

Open the BIBIJUSTDANCE ELEM (69)
The butterfly
Resize 60%
C&P
Image, Mirror
Place as mine on the rose

OK Now
With your Materials Palette (the two top colour boxes on the right of PSP)
Have the Foreground Stroke Properties on Black
and the background fill properties on Nothing

With your Text Tool activated
Find the Bebas Neue font
with a Stroke of 2.00
Creating it as a Vector (always a Vector - well, unless stated otherwise hehe!)
Type out what you'd like
I went for Girly Girl
Then once you've applied
Stretch it to the size you'd like
See mine for guidance
Once you've done that
Convert to Raster
Now
Once you've done that -
Using Magic Wand
Click inside each of the letters to select them
Selections, Modify, Expand by 1
then use a nice contrasting paper from the kit
I went for BIBIKJUSTDANCE PAPERS (10)
Resize 47%
C&P
Then
back to the main tag canvas and our selection area
Paste as a New Layer
Using Move Tool, adjust the paper 'til you're happy with placement
then
Selections, Invert and hit Delete on the Paper layer
Make sure this paper fill is below the black outline font layer
Back to the Black outline font layer
Adjust, Brightness and Contrast and move your Brightness up to 255
(ie. we want to change the Black to White)
Done?
Cool
Ok now on this layer
Adjust, Add Noise and find the Factory Defaults (which on my PSP is
Random, 50, Monochrome not ticked)
Apply
And on this outline layer
Apply a dropshadow of
2
-1
36
3.96
Black
Now merge this layer down to the Paper Fill layer below it
Duplicate
Position as mine on the bottom right of the tag
then
Move both of these layers down the LP so they are where you'd like them
I moved my top one down to just below the winged heart
and the bottom one - well, I kept it where it was :D

OK
Now finally
Add the dropshadow to the elements
I used the same dropshadow that I used on the tube earlier, but you choose
what you'd like
Add to all elements except the merged backgroundy layer we made at the beginning and the two wordart layers we just made
Now add your name as liked
I went for a scripty font in White
and add your artists © info, URL and any scrapkit props you may like to add
Crop once more
Delete the white back
Save as PNG file for optimum quality
Oh, you're done!
Thank you for looking and if you have a go making it - enjoy!

This tutorial was written on the 6th March 2013 by Vix
It is a tutorial written as I went along this morning
trying to come up with new things which I've never done before and therefore
and any potential similarities to other tag tutorials that
may be available is wholly unintended, completely coincidental
and bleddy astonishing!
Any items supplied to use to create your own tag with this tutorial are supplied
in good faith - if I have used something not intended
for usage in this way, please contact me via email.
Any items created by me for the purposes of this tutorial MAY NOT be used in
any other tag tutorials or for PSP Supplies you create (wordart, brushes, masks, templates, kits)
Links to tube/scrap blogs or PTU tube sites are added either through necessity or creator courtesy,
and it is entirely up to the individual (ie. You!) if you choose to visit these sites and/or download/purchase from them.
Scraps used in my tutorials that I've obtained from PTU purchased scrap kits are NOT supplied
in my tutorials supplies.
This website is intended for educational/entertainment purposes only
NO linking to my tut examples, screen shots, files or graphics permitted
All of my tutorials are registered with TWI