Pages

Saturday, 19 December 2009

Tag Tutorial - Christmas Magical - PTU


Tube of Choice - I'm using a seasonal one

Artwork © Jennifer Janesko

If you wish to use the same tube you must purchase it from CILM

However feel free to use whatever you have

Scrapkit - I'm using "Christmas Magic" by Clarey which is gorgeous

and PTU

If you'd like it, please visit Clarey's store HERE

Eye Candy 4000 Gradient Glow

Xero Graphics Greytinter

Mask - Vix_Mask434 HERE


You can choose to do this tag animated - or not :)

_______________

The Usual except 650 wide and 600 pixel canvas

then

Open Frame 2

C&P

Image, Resize 80% (all layers not ticked)


Open Paper 8

C&P

Sandwich between the two frame layers

in the LP

and

Do a Magic Wand

Selection Delete with an Expand of 8

and Delete the excess paper


Open Paper 11

Repeat as above (put this paper above

the other one in the LP)


Now take your Lasso Tool

on Selection Type Point to Point

Mode: Add

Feather and Smoothing 0 and Anti Alias ticked

and draw out a zig zag line across the paper circle

and encompass the rest of the layer - you can start over

at the circle frame and work from left to right - then go over the top of the circle paper

and join up back at the left

(see my tag to get an idea of the zig zag)

Then

on this paper layer

Eye Candy 4000 Gradient Glow

Glow Width 3.00 Soft Corners 0 and Overall Opacity 100

Apply


Now

C&P your chosen Christmassy tube

Place this at the top of the layers

and where you'd like it to be on the tag

then

Duplicate

on the top layer of tube

Adjust, Blur, Gaussian Blur, 2.00

then

change the Blend Mode to Overlay

and

on the bottom tube layer

Apply Xero Graphics Greytinter

Right click on the Greytintered tube in the LP

View, Current Only

then

unhide the Top tube

and

right click again and Merge, Merge Visible

and merge the two tube layers together

then

right click again - View, All

and duplicate the tube

move one down to below the zig zag paper


Now apply a dropshadow to the bottom one

Something like

Vertical -2

Horizontal 6

Opacity 38

Blur 7.25

Black

and hide the top tube

Take your Eraser and erase the part of the tube

that sticks out under the frame

Unhide the top tube

and erase some of that

so it looks like she's coming out of the frame behind

the paper

and then

apply the same shadow to the zig zag paper


Open the fairy lights from Clarey's kit

C&P

Move down the LP to between the frame and zig zag paper layers

Apply a shadow of 0, 0, 35.00


Open Bow 1

Image, Resize 50%

C&P

Place on the left

Duplicate

Image

Mirror


Open the Gifts 1 and 3

Resize 70%

C&P

Place as mine

Shadow the same as the fairy lights


Open Glitter Doodle 4

C&P

Move up the tag canvas to just near the bows as mine

Shadow as before


Open Glitter Doodle 1

C&P

Place under the bows as mine

Shadow as before


Open Holly

Resize, 30%

C&P

Place on the left of the pressies

Duplicate

Image

Mirror

Place as mine

and shadow both


Open Paper 12

C&P

Apply my Mask - Vix_Mask434

and move down the LP to just above the White back

Add a shadow to the frame now - something like 0, 0, 40, 10.26 Black

then

Add your name in a prefered font and style of choice

I used CK Constitution, Black fill, No Stroke

and applied the same Gradient Glow as the zig zag paper

then

Shadow as the elements

Crop the Canvas now

and

add your Artist info etc

If you want an animated tag, read on

If you're happy as it is - then delete the White Back and

save as PNG

IF you're animating - read on...


Duplicate the fairy lights layer twice to total 3 layers


Hide the top two layers

and we're starting on the bottom one

Zoom in if you need to see better

So,

Now

On the furthest fairy light to left

With Magic Wand on Tolerance of about 30

Click inside the light to get the colour selected - might take a few clicks and

don't worry about selecting the white bit in the middle

then skip the next bulb and go for the middle one

Select as before

So, you should now have two bulbs selected

Now go to

Adjust, Brightness and Contrast,

and have the Brightness on 20

and Contrast on 5

OK

Selections None

and

Hide this layer

Unhide the 2nd layer up

Now

Select the next two (the 2nd from left and the one after the middle one)

and

repeat the Brightness etc

Hide

and finally

Select the last bulb on the right

and repeat as above


OK

Hide the top two lights layers

then

Edit, Copy Merged

take to Ani Shop

Paste as New Animation

Back to PSP

Hide the bottom lights layer

and unhide the middle one

Edit, Copy Merged as before

Take to Ani Shop

and Paste After Current Frame

Back to PSP

and hide the middle lights

Unhide the top ones

and repeat as above


So, now in Ani Shop

We've got 3 frames

Click on Frame 1

Edit, Select All

then

Animation, Animation Properties,

change to Opaque, White

then

Animation, Frame Properties

and have the speed on 30

View, Animation

and Save As gif :D

Hope you enjoyed this tut and I wish you

a very blessed and Merry Christmas

xx
Saturday, 5 December 2009

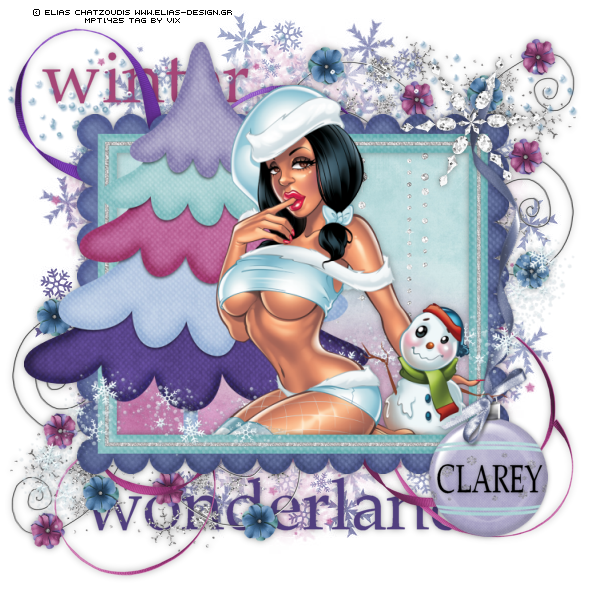
Tag Tutorial - Winter Cutie - PTU


Tube of Choice - I'm using a cute one by Elias Chatzoudis
@ MPT

Scrapkit - PTU - It's called "Winter Bliss" by my
mate Clarey :D She rocks and this kit is
gorgeous! If you'd like to purchase it, please
go HERE for more details

Masks - HERE and HERE

No filters required

This tut is short-handed, ie. I've explained quickly what
I've done, so people familiar with my tut processes should
be fine :D xx


________________________


The Usual

then

Open rectangeframe3

Resize 80%

C&P


Open wintertree

Resize 80%

C&P

Place as mine to the left of the frame

Duplicate

Move one tree under the frame

Dropshadow the bottom tree - 0, 0, 40.00, 10.26 Black

then

Hide the top tree and

Click inside the frame with Magic Wand

and Do a Selection Delete on the bottom tree layer

Expand by 5

and hit Invert

but use your eraser to take away the

treepot at the bottom

Selections None

then

Unhide the Top tree

and erase the treepot so it looks like

the tree is coming out of the frame


Open Paper 9

C&P

Move down the tag canvas a little

then repeat the Selection Delete process

but this time, you can just hit Delete on the paper layer once you've inverted the

selection


Open Paper 8

C&P

Move down the LP to just above the White Back

and apply my Mask 434

Layers, Merge, Merge Group


Open Paper 3

C&P

Move to just above the last mask layer

and apply my Mask 435

Layers, Merge, Merge Group


Open bauble1

Resize 80%

C&P

Place on the right of the frame

Dropshadow as before


Open snowflake4

Resize, 60%

C&P

Place as mine and dropshadow


Open wiredflowers

Resize 60%

Drop down the LP to just above the masks

Duplicate

Image

Mirror

Image

Flip


Open curlyribbon1 and 2

C&P

Place where liked above the wireflowers layer

and dropshadow as before


Open snowdust1

Resize 70%

C&P

Place as mine


Open snowdust2

Resize 70%

C&P

Place just above the wireflowers in the LP

and at the top of the tag canvas as mine


Open the tube you've chosen to use

C&P

Resize as needed

Place where looks best

Duplicate

and move under the frame layer

Add a dropshadow to the bottom one

and repeat the Selection Delete Erase process

Once you've done this

Apply the same shadow to the frame layer

and the wireflowers


Add your name as liked and any words you might

want to use too - I used Palatino Linotype and two

colours from the tag and put winter at the top

and wonderland at the bottom lol!

Crop the canvas

Add your artist info

Delete the White Background

and

save as .PNG

Hope you like xx

Friday, 4 December 2009

Tag Tutorial - Christmas Comfort - PTU


Tube of Choice - I used one of the Christmas gifts by Keith Garvey from last
year @ MPT. However, I think this tube is now available to
buy if you'd like to use the same

Scrapkit - PTU - I'm using "Holiday Wishes" by Jessica @ Gothic Inspirations
I used this in my last PTU tut, but I said at the time, it's packed
full of goodies perfect for taggies...and I wasn't kidding lol!
If you'd like to purchase the kit, go to Jessica's blog for more
info HERE

Mask - by me HERE

Wordart - by me HERE

Xenofex 2 Constellation


____________________

The Usual

then

Open the WindowWSnow

Resize 80%

C&P

Place centrally


Open Candles2

Resize 20%

C&P

Place on the left of the windowledge

Duplicate

Place on the right

Then

Drop both of these layers below the Windows layer

(The snow is on the window, so we're outside looking in :D)


Open the Pine Garland

Resize 50%

C&P

Place as mine at the top of the window

Then

Dropshadow

0, 0, 40.00, 10.26, Black


Now

Take your Magic Wand

Click outside of the Window

Modify and Expand the Selection by 6

then

hit Delete on the Pine Garland layer


Open my Wordart

C&P

Place on the window frame

and apply the same shadow as before if liked


Open TreePine

Resize 60%

C&P

Place as mine over to the left of the window

and

move it under the window frame in the LP

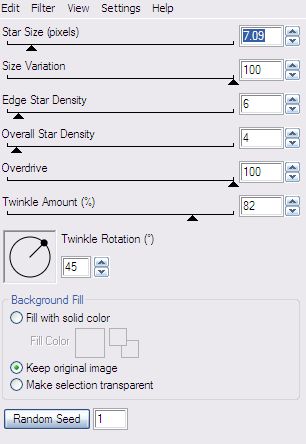
Apply Xenofex 2 Constellation on these settings;


Hit Random Seed to get the placement you'd like

then

and apply the same shadow as before

and do the same delete process as used for the Garland


Open Paper17

Resize 70%

C&P

Place under all the layers

and repeat the process for deletion of outside excess


You can - if you'd like - decorate your tree

with some of the candy canes etc

Resize them as needed

But, I didn't do this as I thought looked cool as it was :)


Open your chosen tube

C&P

Place as you'd like

Dropshadow

then drop down below all the layers to just above the tree

and

repeat the delete process


Open Paper7

Image, Resize 70%

C&P

Place just above the White Background

and

apply my Mask 434

then

Erase the parts of mask that show under the bottom of the window ledge


Open the Snowflake Frame

Resize 75%

C&P

Place just above the mask layer

and dropshadow as before

And again, delete the small part of frame that shows under the window ledge


Don't dropshadow the Window though xx


Last touches...

Open Holly2

Resize, 15%

C&P

Place to the right of the windowledge

Duplicate

Image

Mirror

Shadow as before


Finally, add your name in a style and font of choice

and

Add your artist info (and scrapkit designer info if required)

Crop the canvas to a more taggy size

Delete the White Background

and

save as .PNG

OR!!!

If you want to add an animated snow effect to the tag, then do so now

and save as a .GIF

Have fun and Merry Christmas xx

Thursday, 3 December 2009

Tag Tutorial - Christmas Love - PTU


Close Ups of Choice - I used two from Keith Garvey
These can be obtained from MPT

Scrapkit - I'm using a fantastic Christmas kit by Jessica @ Gothic Inspirations
It's PTU and called "Holiday Wishes" and packed with tons of goodies for lots
of Christmas tags, I love it, thank you Jess hun xx
If you'd like to buy it, please visit GI for more details

My Masks - Vix_Mask434 which can be right clicked and saved from
my other blog HERE and Vix_Mask147 which you can get from my
tut site HERE

Wordart by me HERE
It's a PNG file so should be no background on your downloaded one

Xero Graphics GreyTinter


Xenofex 2 Constellation - optional


___________________________


The Usual - except make the tag canvas 650 wide x 600 pixels

then

Open Frame4

Resize 70%

C&P

Place centrally to the canvas

So let's get this frame filled so we can fill the tag with goodies :D


Open two tubes of choice - facial close ups or large tubes if prefered

I used close ups

Then C&P

Place as liked

then use a Selection Delete with an expand of 14 - yes really lol! - and

Invert and delete the excess tube/s

and Crop the canvas to it's current size 650 x 600

then

Duplicate the tube layers

Adjust, Blur, Gaussian Blur 2.00

and change the Blend Mode to Soft Light

and

then

on the bottom tube layer - apply Xero Graphics Greytinter on the default settings


Paste a Paper from the kit - I used

Paper18 - resized to 70%

Move the paper under the tubes and repeat the Selection Delete as before

as you just want this paper as a background frame fill

(There is a space in the bottom middle of the frame - but this will be sorted in a minute lol!)


Open Paper 7

Resize as before

C&P

then apply my mask - Vix_Mask434

and

Layers, Merge, Merge Group

now open Paper 10

Resize and C&P as before

but this time - apply Mask...yeah, my mask 147 again hehe, I think

it compliments a lot of tags so I'm using it again, but feel free to use

a different one of your choice

and Merge Group as before

then

move the 2nd mask down the LP so it's under the 1st mask layer


Back to the elements...

Open Bow2

Resize 50%

C&P

and place in the bottom middle of the frames

Open the Candles - gorgeous!

Resize 25%

C&P

Place on the left side of the frame

Duplicate

and move the duplicate over to the right of the frame


open CandyCanesWBow

Resize 40%

C&P

Place as mine


Open the Leaves Fern

Resize 40%

C&P

Place as mine on the right


Open the Bow (it matches the one on the Candy Canes)

Image, Resize 25%

C&P

Place as mine over the Leaves


Move the candles layers to the top of the LP


Open the Pine Garland

Image, Resize 80%

C&P

Place as mine just above the frame layer


I also added a subtle Constellation effect to the Leaves layer - but this is optional


Now add some dropshadows where you'd like

I added a drop of 2, 2, 45.00,

to

Leaves

Candy Cane

Bow

Bow 2 (the gold one)

Pine Garland

then

I added a dropshadow of 0, 0, 40, 10.26 Black to the Frame layer


Open my Wordart

C&P

Place as Mine


Then add your Name as liked

Add your Artist info

and then

Crop the tag again and

Delete the White Background

and

Save as .PNG