SUPPLIES NEEDED
Tube - I'm using a beautiful and haunting one by
Jasmine Becket-Griffith, licensed via Creative Design Outlet(CDO)
If you'd like to use the same tube in your tag, you can purchase it HERE
Scrapkit I'm using a fab Inspired By mini-kit that was made to compliment the same tube. It's by my friend, Chichi
and it's also available from the CDO site HERE
You can - of course - use a tube and scrapkit of your choice
Mask - one of mine called Big Mask 19 which you can get HERE
Mura Meister Copies
Xero Graphics Greytinter
Font of your choice
____________
Open a New Image in PSP
700 x 600
FF White
Copy and Paste your chosen tube
Then
Open - Frame
Image, Resize 40%
C&P
Duplicate the tube layer
Hide the main copy for now
and
Position the duplicate within the frame area as liked
and then
Click inside with Magic Wand to activate the frame inner
Selections, Modify, Expand by 4
Selections Invert
And hit Delete on the tube layer
Make sure this is below the frame layer in the LP
Now, duplicate this selected tube layer
and on the top one, Adjust, Blur, Gaussian Blur, 2.00
and change the Blend Mode to Overlay
and on the bottom tube layer
Xero Graphics - Greytinter on Overall Tint slider at 100
Apply
Open one of the Papers you'd like, position within the frame inner area
and repeat the Selection Invert Delete process for the paper layer
and now the blurred tube layer too
Make sure this paper layer is below the frame and tube area layers
and finally add a subtle dropshadow of choice to the frame layer
I used 2, 0, 33, 5.00, Black
Now, making sure that the Main tube layer and the White Background are
hidden
Layers, Merge Visible
Unhide the White Background but keep the main tube layer hidden for the moment
So
Duplicate your frame layer
and on the top copy
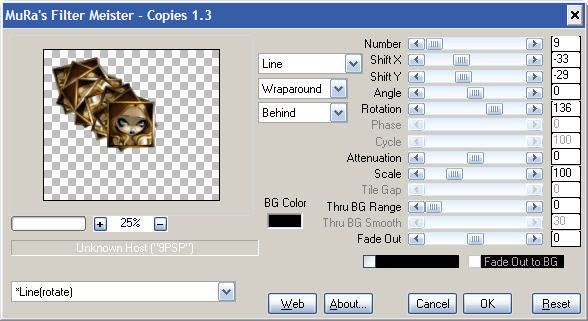
Apply Mura Meister Copies on these settings of mine

Now unhide the main tube and move up to the Top of the LP
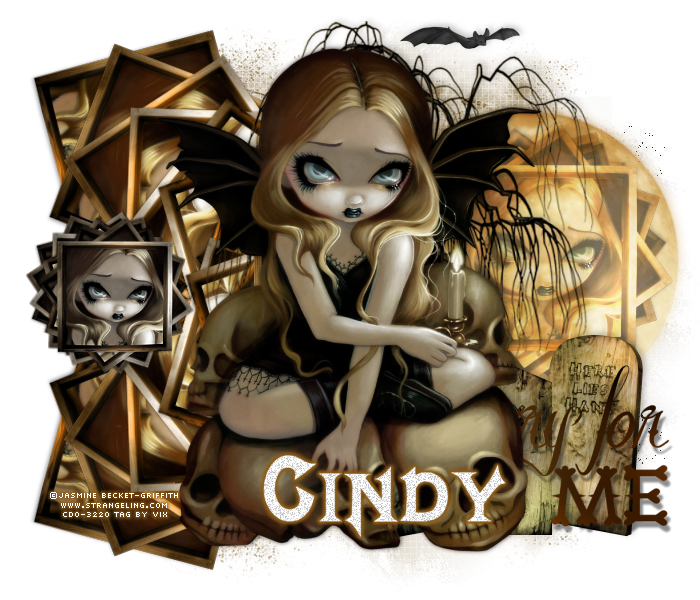
and check for placement of your tube against mine
We want the Copies to compliment the tube position
so if yours doesn't - then undo, go back and jiggle the
Copies settings
Once happy with the stretch and placement - apply and
move the tube up to the top
Duplicate the copies layer
Image
Flip
Open the Moon element
Image, Resize, 60%
C&P
Line up with the batwing of the tube to the right of the middle tag canvas
See my tag for ref
Move this moon layer down the LP so it's just above the White Back
Duplicate
and on the bottom copy - Adjust, Blur, Gaussian Blur, 5.00
Open the Bat
Image, Resize 20%
C&P
Place as mine at the top of the tag area
Open the Tombstones
Resize 50%
C&P
Place as mine over to the right
move down the LP so it's below the tube layer
Open the Tree
Resize 80%
C&P
Place as Mine over to the middle right
Position within the LP so it's below the tube layer
but above the two Mura's layers
Reposition the bat layer now if liked
Remember the spare frame layer we had?
Move this right up the Layer Palette so it's at the top
Duplicate once more, and hide one
then
place in the centre of the tag
Now
Mura Meister Copies, and apply these settings

Now position as mine over the moon area
and change the Blend Mode of this layer to
Hard Light
and drop the Opacity of this layer to 50%
and unhide the other frame layer
Image, Resize, 60%
Adjust, Sharpness, Sharpen if needed
Repeat the Copies settings you just applied to the other one
and also apply the same Greytinter settings as we did earlier
And position as mine
Open the Wordart2
Resize 60%
C&P
Place as mine over to the bottom right
and move down below the tube layer
Open Paper 5
Don't resize the paper just
Edit Copy
and then Edit, Paste as a New Layer
Move down below all the layers except the White Background
then
Crop to the current tag canvas size of 700 x 600
and
on this layer, apply my Mask called Vix-BigMask019
Layers, Merge Group and move the mask layer slightly over to the right a little
Duplicate
Image
Flip
and move this down a little so it peeks out from the bottom of the assorted elements and tubes - take care it's not touching the edge of the tag canvas
Activate the tube layer once more
Duplicate
And apply a Gaussian Blur overlay as liked
I used 2.00 blur and Soft Light
and apply Xero Greytinter to the bottom tube copy
Now apply a favourite dropshadow to the elements and tube layer
(don't shadow the framed Mura layers or the wordart -
they were all shadowed already)
I used
-2, 3, 23, 8.91, Black
Now finally
Add your name in a font of choice and finish of choice
Add your copyright information and/or license number
Crop
Delete the White Background
Save as a PNG file
Tag!
Hope you enjoyed this tut xx
This tutorial was written on the 23rd of October 2012 by Vix
It is a tutorial written as I went along this morning
and any potential similarities to other tag tutorials that
may be available is wholly unintended and completely coincidental.
Any items supplied to use to create your own tag with this tutorial are supplied
in good faith - if I have used something not intended
for usage in this way, please contact me via email.
Any items created by me for the purposes of this tutorial MAY NOT be used in
any other tag tutorials or for PSP Supplies you create (wordart, brushes, masks, templates, kits)
Links to tube/scrap blogs or PTU tube sites are added either through necessity or creator courtesy,
and it is entirely up to the individual (ie. You!) if you choose to visit these sites and/or download/purchase from them.
Scraps used in my tutorials that I've obtained from PTU purchased scrap kits are NOT supplied
in my tutorials supplies.
This website is intended for educational/entertainment purposes only
NO linking to my tut examples, screen shots, files or graphics permitted
All of my tutorials are registered with TWI