Thursday, 28 February 2013
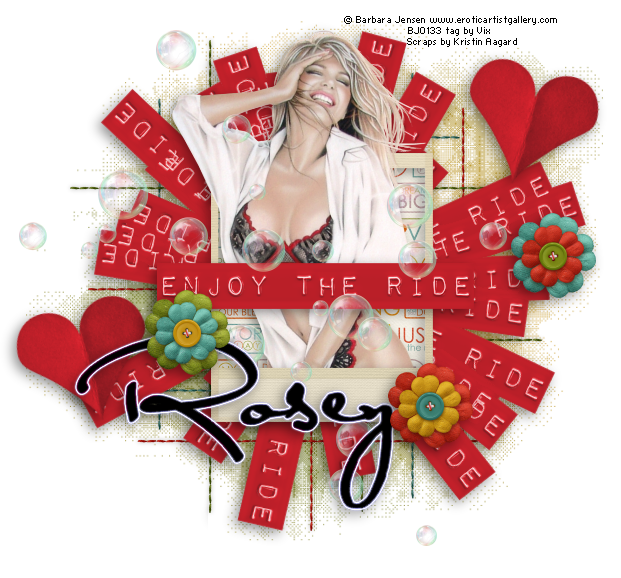
Tag Tutorial - PTU - Enjoy the Ride
This tag uses one of my favourite ever tubes by Barbara Jensen - it never fails to
inspire me!
And this is another tag inspired by a song by Nik - Enjoy the Ride!
Check out his superb album "Ei8ht" from all good music sites
SUPPLIES NEEDED
Tube of Choice - I'm using "Sheer" by Barbara Jensen - an oldie but a very goodie!
See Barb's site for her beautiful tubes and don't use without a license...'cos that's just mean! (ok, it's also illegal too but yannow!)
Scrapkit of Choice - I'm using a PTU mini kit by the superb designer, Kristin Aagard @ Scrap Orchard
The kit is called Enjoy Life and you can purchase it HERE
Mura Meister Copies
Toadies What Are You?
Eye Candy 4000 - Gradient Glow
Font of Choice
This tut uses a method in PSP to make a mask - eeks! So, this isn't really for
beginners to tag making, but see how you get on...
_______________________
Open a New Image in PSP
650 x 600
Add a New Layer
FF White
Open the KAagard_EnjoyLife_Word_EnjoyTheRide file
Image, Resize 30%
Edit, Copy
Edit, Paste as a New Layer
(C&P for short!)
Right click on this layer in the Layer Palette (LP)
Duplicate
Hide the top one
Click on the bottom one in the LP to activate it
Go to Mura Meister Copies - Star Cluster preset
and change the Shift X and Shift Y sliders to 40 each
OK to Apply
Like the placement? Good
If not, Undo and go back in and do it again
You'll get a slightly different placement each time
so fiddle 'til you like it
Add a Dropshadow of
4
-4
43
17.82
Black
Now
Open KAagard_EnjoyLife_Frame1
Resize 15%
C&P
Above all the other layers
Open KAagard_EnjoyLife_Paper3
Image, Resize, 15%
C&P
Move down under the frame layer
And click inside the frame area and Use Magic Wand to do a Selection Delete
Expand by 3
then Invert and hit Delete to get rid of the excess paper
Now copy and paste your chosen tube
Use either a close up and fill the frame area
or a tube and do a double tube layer
(one above and one below the frame) and
erase the top and bottom as needed
Oh, girlies (and guys!) I've done it a thousand times
Check out my previous tuts to see the method
if you're not sure, but if you've done my tuts for
years, you'll be familiar with it hehe xx
Open the EnjoyLife_Heart
Image, Resize 15%
C&P
Place wherever you have a gap in the background wordart arrangement
Repeat if liked
and free rotate these heart layers 15% either to left or right, whichever you'd like
Open the EnjoyLife_Bubbles1
Resize to 15%
C&P
Place over the top of the tube area
Line up to how it looks good for your chosen tube
Repeat this with the _Bubbles2 file
And erase any that you'd like to remove (if any overlap where you don't want them)
Open the Enjoy_Life_Stitches
Resize 15%
C&P
Place just above the White Background layer
Open a few of the Flower files
Resize to 10%
C&P
Place as many or as few as you'd like on the tag canvas
It was at this point I decided I wanted to recolour the red
elements of the tag to match the red from my tube
So I did
If you'd like to do the same, just hover your Dropper tool over the colour
you'd like to swap to
Then go to the Materials Palette and find the Hue and Saturation value
then off to Adjust, Hue and Saturation, Colourize and place the
two numbers in there
I did this for the hearts and the wordart layer
Now
Add a Dropshadow of
4
-4
43
17.82
Black
to all the layers except the bubbles and stitches
(and the tube which you shadowed earlier!)
Unhide the original wordart strip layer we hid at the beginning of the tut
Place where it suits your tag
Recolour if liked and apply the same shadow
On the stitches layer
add a drop shadow of
0
0
35
7.00
Black
Now take your font of choice
and using the Text tool
with both colour boxes on Black
and a Stroke of 1
Type out your name
Covert to Raster then
move down the LP
to where you'd like it
I placed mine just above the frame layer
Now Eye Candy 4000 - Gradient Glow
Look for the Preset called Neon Outline
and move the Glow Width slider all the way down to 3.00
OK to apply
and then apply the same larger dropshadow we used earlier
Hide the White Background
Layers, Merge, Merge Visible
Duplicate the merged tag layer
Activate the bottom layer
and then in the Materials Palette
change both of your colour boxes to White
then
Go to Toadies - What are You?
And apply the default settings - 20 and 20
Now
Copy this Layer
and Paste as a NEW IMAGE
On this new Image
Image, Decrease Colour Depth, 2 Colours
and
Have the Palette Component on Grey Values
and
Reduction Method as Ordered Dither
OK to apply
and then
Image, Negative Image
Ooooh look, you've got a mask hehe!
Leave this image for now
Back to our working canvas
DELETE the Toadied layer
Pick two colours from your tag
I went for yellow and green
Make a FG/BG Gradient on the settings you like
I went for Linear on 45 with a 2 repeat
Add a New Layer
Floodfill with this gradient then
Layers, New Mask Layer, From Image
In the Source Window dropdown box
Choose your mask image you just made
and have the Create Mask from
Source Luminance selected
Invert Mask Date not ticked and hit OK
Ta-da!
There's your mask!
It's a little big for the tag - it touches the sides and we
don't want that (looks naaaaasty!) so
Layers, Merge, Merge GROUP
and you should see your mask layer is now all on one layer in the LP
So now
Image, Resize
90%
All Layers Not Ticked as we only
want to resize the mask layer
You can close the mask image you made now as we're done with it
Now finally
Add your artist and scrap designer (if applicable) information
Crop the canvas if liked (take care not to chop any of your tag)
and delete the White Background layer
Save as a PNG
All done! xx
Note: if you like to make lots of tags for others, don't add the Name layer
when I do - simply add it after you've done the mask addition xx
This tutorial was written on the 28th February 2013 by Vix
It is a tutorial written as I went along this morning
painstakingly trying to come up with new things which
I know I've never done before and therefore
and any potential similarities to other tag tutorials that
may be available is wholly unintended, completely coincidental
and would bleddy astonishing!
Any items supplied to use to create your own tag with this tutorial are supplied
in good faith - if I have used something not intended
for usage in this way, please contact me via email.
Any items created by me for the purposes of this tutorial MAY NOT be used in
any other tag tutorials or for PSP Supplies you create (wordart, brushes, masks, templates, kits)
Links to tube/scrap blogs or PTU tube sites are added either through necessity or creator courtesy,
and it is entirely up to the individual (ie. You!) if you choose to visit these sites and/or download/purchase from them.
Scraps used in my tutorials that I've obtained from PTU purchased scrap kits are NOT supplied
in my tutorials supplies.
This website is intended for educational/entertainment purposes only
NO linking to my tut examples, screen shots, files or graphics permitted
All of my tutorials are registered with TWI

Wednesday, 27 February 2013
Tag Tutorial - FTU - The Sky's The Limit
Another Nik inspired tag - check out this beautiful song HERE
SUPPLIES NEEDED
Close Up or Tube of Choice - I'm using "Butterfly" by Alex Prihodko which should be purchased
if used in a tag - you can get it HERE
Cloud Tubes - by Rainbow Coffi which you can get from PSP-Playground HERE
Look for Cloud Formation and Cloud Formation 2
Angel Mini Freebie Kit - by Candy's Treats - a gorgeous FTU mini from Diane which you can get HERE
Please leave some love if you download it
Masks needed are
My mask called BigMask_019 - you can download the zip of my masks HERE
and also
Chelle's mask called WSL_Mask196 which you can get from her site HERE
Xenofex 2 - Little Fluffy Clouds
Xero Graphics Greyscaler and Radiance
Penta.com Colour Dot
Font of Choice
______________
Open a new image in PSP
550 x 175
Floodfill White
Change the two Material Palette boxes to White as well
Now
Add a new Layer
and go to Xenofex 2 - Little Fluffy Clouds
on the default settings
(If you haven't got this filter - not to worry, just
floodfill with some sky blue colour or use a sky paper etc)
OK to apply
Open the Rainbow Coffi tube called Cloud Formation
Copy and Paste and place to the left of the tag canvas
then
Open Cloud Formation 2
and
Copy
And paste as a new layer on the tag canvas to the right
See my tag for positioning reference
OK
Now choose your Close Up image of choice
Copy and paste your image as a new layer on the LP
Place this above the cloud layer
Make sure it's not so massive that you can't see any of the blue sky behind
so resize now if needed
Duplicate it
and
On the top copy
Adjust, Blur, Gaussian Blur, 10.00
then
Apply Xero Graphics - Greyscaler on the default settings
and then Radiance on the default settings
Change the Blend Mode of this layer to Soft Light
Now crop to canvas size
and then
Layers, Merge, Merge Visible
Now
Selections All
Selections, Modify, Contract and choose 5
Selections, Invert
and then go to Penta.com - Colour Dot on the default settings
Apply
Keep Selected
Selections, Promote Selection to Layer
Selections None
If this effect doesn't show up much for you then
change the Blend mode of this layer to Burn or something else
that shows up on your colour scheme/chose tube area
Layers, Merge Visible
Now
Image
Add Borders
And add a 1 pixel black border (symmetric ticked) and then a 1 pixel White Border
OK
Layers
Promote Background Layer
then
Image
Canvas Size
and let's whack it up to a big tag size!
700 x 600
Add a New Layer
Floodfill White
Move to the bottom of the Layer Palette
Open the Candy's Treats Paper called ct-paper 7
Image, Resize, 70%
Copy and Paste as a new layer above the white background
and
Apply the WSL Mask called WSL_Mask196
(apply it as Fit to Layer not Canvas)
Layers, Merge Group
Open the ct-lace
Copy and paste as a new layer above the Mask layer
Open the Glitter Circle
Copy and Paste above the previous 2 layers (mask and lace)
Open the ct-clouds
Copy and Paste
Position as mine and make sure these are above the mask
layer but below the glitter circle in the LP
Duplicate
Image
Flip
Image
Mirror
Open the ct- flower cluster
Copy and Paste
Position to the bottom of the tag area
Duplicate
Move this next one and position as liked
I mirrored my one
When happy with the placements
Move both of these layers down below the tag layer
Keep going, you're doing great!
Open the candy's treats Angel halo
At the top of the LP, paste as a new layer
Move over to the right hand side of the tag layer area
Position exactly as mine and
Once happy with the placement
Duplicate this layer
move the duplicate down the LP below the tag layer
On the top halo layer
Erase the top right corner section so it looks like the halo is emerging
and apply a subtle dropshadow to the bottom halo layer only
Add a new layer above the White Background
Floodfill with a darker colour to compliment your tag
and apply
Vix_BigMask019 to it
Layers, Merge Group
Ready for some finishing touches?
Cool
Ok
Take a favourite scripty font and in the same colour we used for the last
mask, type out your wording and name layers
Apply
Subtle Shadow as liked
(I used a subtle shadow - see my previous older tuts for the settings)
Now shadow the two flower layers the same
and also the tag layer
And now add your artist information
and crop to 674 wide by 589 high
Delete the White Background layer
Save as a PNG
All done! :)
Thanks for looking, have fun trying and enjoy!
This tutorial was written on the 27th February 2013 by Vix
It is a tutorial written as I went along this morning
painstakingly trying to come up with new things lol so
I hope I did and therefore
and any potential similarities to other tag tutorials that
may be available is wholly unintended and completely coincidental
and would bleddy astonishing!
Any items supplied to use to create your own tag with this tutorial are supplied
in good faith - if I have used something not intended
for usage in this way, please contact me via email.
Any items created by me for the purposes of this tutorial MAY NOT be used in
any other tag tutorials or for PSP Supplies you create (wordart, brushes, masks, templates, kits)
Links to tube/scrap blogs or PTU tube sites are added either through necessity or creator courtesy,
and it is entirely up to the individual (ie. You!) if you choose to visit these sites and/or download/purchase from them.
Scraps used in my tutorials that I've obtained from PTU purchased scrap kits are NOT supplied
in my tutorials supplies.
This website is intended for educational/entertainment purposes only
NO linking to my tut examples, screen shots, files or graphics permitted
All of my tutorials are registered with TWI

Monday, 25 February 2013
Tag Tutorial - FTU - These Tears
This tutorial was inspired by my current listening choice - the superb album "Ei8ht" by Nik Kershaw
I make no attempt to hide my Nik mania having loved him and his
music since 1984 and his most recent album has gradually worked it's way
into my heart
And that's good news. If I'm inspired - I tag and also tut!
So, I hope to be similarly inspired by other tracks on there.
Wanna know what I'm on about? Check out Spotify or Amazon
Anyway, if you'd like to make this tag?
SUPPLIES NEEDED
Tube/Close Up/Image of Choice - I'm using "Angel Tears" by Zindy S D Nielsen which can
be purchased from Zindy's tube shop HERE
A few scraps - I'm using a FTU kit by the fabby Kittz called "Misfit Style" and it's available
from the Misfits blog HERE
Please take a moment to leave some love if you download it - thank you
My Wordart - HERE
Mura Meister Copies
Toadies - What Are You?
Both of these filters are freely available on the Internet
Eye Candy 4000 - Gradient Glow
Not a freebie, so don't worry if you haven't got this
Font of your Choice
_________________________
Open PSP
Change your Materials Palette (the two colour boxes) to White #FFFFFF
Now, open a new image canvas in PSP
250 pixels wide by 100 pixels high
So, you've got a rectangle canvas
Excellent
Open your chosen Image or Close Up tube
Copy the image
Paste as a New Layer on the small canvas
OK, so
Position your tube within the small rectangle as you like it
Once you've positioned
Right click on this layer in the Layer palette and hit Duplicate
and on the new top layer in the Layer Palette
Adjust, Blur, RADIAL BLUR on the default settings
now change the Blend Mode of this layer in the LP to Soft Light
or similar - something that compliments your tube
Now
Image
Add Borders
2 on all settings
White
Symmetric ticked
OK to apply
then
go back in and set 1 on Black
then once more
3 on White
and finally
2 on Black
So, that's 2 - White
1 - Black
3 - White
2 - Black
OK?
Coolio!
Layers, Promote Background Layer
and
then
Image
Canvas Size
and change to 450 wide by 300 high
with the image we've got in the middle and a transparent background
So you should still have the "tube/image" on your Clipboard
So, Paste this once more as a new layer in the LP
Make sure it's underneath the current tag layer we've been playing with
Move it over to the Right side of the Canvas
(If you've used a huge image - just paste where it looks best and improvise with the
next few steps)
Once you've pasted over to the right
Right click in the LP
Duplicate
Image
Mirror
Hide the rectangle tag layer for the moment
Layers, Merge Visible the two tube image layers
then
Duplicate this layer
and
on the bottom one
Adjust, Blur, Gaussian Blur on 40.00 - yup, 40.00
then
Effects, Texture Effects - Mosaic, Antique
on the default settings
Add a new Raster Layer to the tag canvas
Move this down to the bottom of the LP
and
Floodfill with White
then
Add another layer above this
and floodfill with Black
Back to the merged tube images layer
Duplicate
and on the top one
Adjust and once more apply the Radial blur setting we used earlier
and again, change the Blend Mode to Soft Light or similar
then
on the lower version of this layer
Add the following drop shadow
4
-4
43
17.82
Black
Make sure the rectangle tag layer is hidden still
and now Layers, Merge Visible all the other layers
Back to the Layer Palette, you should now only have 2 layers
the small tag layer we made
and the Merged layer we just did?
Cool - on we go
Duplicate the rectangle image layer
and on the top copy
Effects, Image Effects, Seamless Tiling
and apply the Default Setting
which should be as follows
Tiling Method - Corner
Direction - Bidirectional
Transition - 50
and
Corner Style - Linear
OK to apply
and then apply the drop shadow we used earlier
Now
Image
Add Border
and apply the sequence we used earlier - the Whites and Blacks
Once you've done this
Layers, Promote Background Layer once more
then
Image, Canvas Size and once again, we're upping it - this time
650 wide and 600 high
Now, duplicate the tag layer
and on the bottom one
(Make sure that both your Materials Palette boxes are on White)
Effects - Toadies - What are You?
and change the sliders
Top slider (X-dose) to 30
and
bottom one (Y-dose) to 15
Now add a new Raster Layer
and floodfill it with White
Move to the bottom of the LP
Back to the Toadies layer
Duplicate it
On the bottom one
Image, Free Rotate
Left, 90 degrees
then
Image, Resize, 80%
All Layers Unticked
Duplicate this resized layer
Mura Meister Copies
Look for the Preset called Wave (Horizontal)
and change the Number slider at the top to 1
Yup, we just want one :)
Click OK to apply
and then resize this layer 80%
Then
Duplicate it
and Mirror it
OK, we're getting towards the end
On the main tag layer at the top
Duplicate this one again
and Apply the Mura's once more to the duplicate one
Move this under the main tag layer
But don't duplicate it or mirror it
Now, apply the same dropshadow we used before to both of these tag layers
OK, now find a black and white scrapkit you'd like to use - or use the one I did
And I used
MS-2 - the butterfly - resized to 50%
MS-9 - the doodled frame - used as is and moved
down the Layer Palette to just above the Toadied layers
then positioned as mine over on the bottom left
Duplicate this and move the duplicate to the top right as mine
MS-44 - the rose - resized to 70% twice, then placed as mine
and sharpened
Apply the same dropshadow we used before to the rose and butterfly but
NOT the frame layer
Now the final bits
Open my Wordart I've provided
Copy and place as liked on the tag canvas
Then find a lovely scripty font to add your name with
I used Angilla Tattoo
with a contrasting colour - no stroke
and then applied a Gradient Glow to it
Now add your artist information
Crop the tag to remove the excess area
Delete the White background layer
Save as a PNG
All done!
Hope you enjoyed this simple tut xx
This tutorial was written on the 25th February 2013 by Vix
It is a tutorial written as I went along this morning
and any potential similarities to other tag tutorials that
may be available is wholly unintended and completely coincidental.
Any items supplied to use to create your own tag with this tutorial are supplied
in good faith - if I have used something not intended
for usage in this way, please contact me via email.
Any items created by me for the purposes of this tutorial MAY NOT be used in
any other tag tutorials or for PSP Supplies you create (wordart, brushes, masks, templates, kits)
Links to tube/scrap blogs or PTU tube sites are added either through necessity or creator courtesy,
and it is entirely up to the individual (ie. You!) if you choose to visit these sites and/or download/purchase from them.
Scraps used in my tutorials that I've obtained from PTU purchased scrap kits are NOT supplied
in my tutorials supplies.
This website is intended for educational/entertainment purposes only
NO linking to my tut examples, screen shots, files or graphics permitted
All of my tutorials are registered with TWI
Subscribe to:
Posts (Atom)