Tube of Choice - I'm using one of my favourites by Suzanne Woolcott - you can purchase it HERE at the Gorjuss store.
Scrapkit - Ghost Town by Clarey- I love this! You can get it HERE at Clarey's store.
Mask - my own Mask - Vix_Mask452 which you can get at my blogsite HERE
Wordart - by me, created specifically for use with this tutorial. Please do not share this wordart around, use for any other tag tuts or use in your
kits, masks, templates, stuff that you share. It's PU only for you. Okely-dokely?? Thank you xx
Get the wordart HERE
It's a PNG so just right click and save to your own computers :)
_____________________
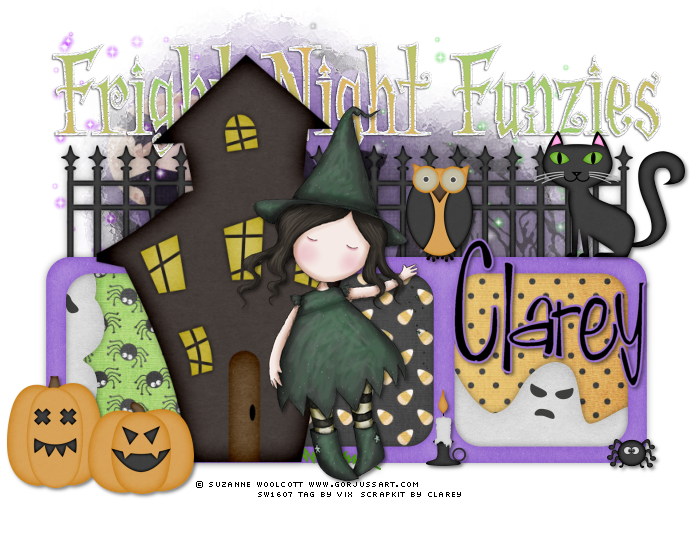
This kit is rockingly good - so we're making a BIG tag!!
Again, as with any of my tuts, if you prefer smaller tags then start smaller and
adjust the resizings as needed...
OK
So - open a New Image in PSP - 700 pixels wide by 600 pixels high with a 72.00 pixels/inch Resolution (always a 72.00 resolution
when making signature tags)
Add a New Layer and guess what? Correct! Floodfill White
Now
Open your chosen tube, C&P and place as a New Layer on the canvas
then
Open purpleframe
Image, Rotate Right
C&P as a New Layer on the tag canvas
Close the original purpleframe file and don't save changes
Line up the frame centrally to the tag canvas (you may need to just move it up or down a little)
so it lines up with the bottom of your tube's feet...if it has any :)
Open hauntedhouse2
Image Resize
80% Smartsize
C&P
and line it up as I have done with the bottom edge of the frame
Make sure the house is under the tube but above the frame layer in the LP
Open fence
Image Resize 70%
C&P
Move this layer UNDER the frame layer in the LP
Right, that's the bones of the tag....let's get onto the meat lol
Open paper7 (the spiders)
Image, Resize 86% SS
C&P
Place under the frame layer in the LP
then take Magic Wand on the usual selection settings
and click inside the left frame square
Selections, Modify, Expand by 4
Selections Invert
and hit Delete on the paper layer
Selections None
Take Paper10 (the spotty one)
Repeat as above for the right section of frame
then
Open Paper16 (candycorn)
and repeat above for the middle section
OK
So that's the frames filled
Now
Open Paper15 (hauntedhouse)
Resize
C&P
Then
Apply my mask Vix_Mask452
Layers, Merge, Merge Group
and make sure you move this layer below all the other but above the White Background
Take your Selection Tool, on Rectangle
And draw out a Rectangle horizontally along the bottom of your tag canvas
and then when on the Masked layer, hit Delete
We want to get rid of the mask that pokes out underneath the frame at the bottom
Selections None
Again, with Selection Tool - draw out a smallish square on the Haunted House layer
to include the small moon and bats - then hit Delete (gorgeous though it is, we've got a moon from the paper beautifully showing behind the house lol!)
Selections None
Open ghost3
C&P
Place within the area of the right frame square
Dropshadow it as prefered for your tubes
then
Do a Selection Delete to get rid of the excess ghost (now, there's a sentence ya don't say everyday lol!!)
Open ghost2
and repeat as above for the left
Open cat
Image Resize 30% SS
C&P
Place on the right of the frame as mine
So this layer will be at the top of the LP
Open owl
Resize as for cat
then
C&P
and place as mine with his little claws
overhanging the frame
Again, he'll be above the other layers in the LP
Open pumpkin1
Resize 40%
C&P
Place as mine over on the left of the tag
Open pumpkin3
Resize as before and place as mine
Open spider
Resize 20%
C&P
Place as mine
Open candle
Image Resize 20% SS
C&P
Place as mine - IF you use the same tube as me, you'll need to erase the tube's candle
Now
Open the Sparkles 1 2 and 3
Place as liked just above the Masked Layer in the LP
Resize if needed/liked
If any stick out under the frame layer at the bottom - erase them
Open the Wordart I've provided for this tutorial...ONLY!
C&P
Line it up as mine
and
Move it down the layer palette (LP) to just below the Haunted House layer
Now
Tube - Shadow 2, 2, 50, 5.00 Black
Apply this same shadow to pumpkins, spider, candle, cat and owl
House - 0, 0, 40, 10.00 Black
Apply this same shadow to frame and fence layers
Now add your name in a font and style as liked
And place it over the right side above the ghost's head :)
Dropshadow as for the tube
Add your artist info now
then
Go to Crop Tool
And clicking on the Nodes, move the crop inwardly taking care
not to crop any shadow, mask etc
Tick to Crop
then
Delete White Background
and
Save as a PNG
All done!!
Enjoy :) xx
This tutorial was written on 5th October 2010