
SUPPLIES NEEDED
Tube of Choice - I used a PTU one by Suzanne Woolcott aka gorjuss
Scrapkit - Cupcake Party Tag Kit by Clarey - you can purchase it HERE
Xenofex 2 Rip Open
Mura Meister Copies
Mask of your Choice - a rectangular one would be good
************************
OK - We're going to make a nice big tag :D So if you need to start
smaller - cool, just adjust the following sizings as in proportion to your start size :)
The Usual - but make it a 650 x 600 pixel New Image
Add New Layer
Floodfill White
Open roundframe1 from Clarey's kit
C&P
Resize 80% Smartsize
Using Magic Wand on your usual selection settings - see my Glossary of Terms section over on the right if you're not sure what settings to use
Click inside the roundframe1 and Selections, Modify, Expand by 6
then find the paper12
Image, Resize 86% Smartsize
C&P on the tag canvas
Place as liked within the frame
Selections, Invert, Delete
Selections, Invert
and then find paper6
Resize as before
C&P
But, move this down the tag canvas
so it's just under halfway up the frame centre - see my tag for ref
Once happy with placement - repeat the Selections, Invert and Delete
Selections, None
Now, move both of these paper layers down the LP
so both are under the frame layer
Whole paper nearest the bottom
So, on the pink half filled paper layer
Take your Freehand Selection Tool
Have it set to 3 Feather - Add - Point to Point
And select the top horizontal edge of the paper
Start at the left side - go across the top of the pink paper area and slightly beyond
then back over to the left side again to join it - jaggedy as you like - from one
side of the paper to the other
See this example below to show you how I selected it
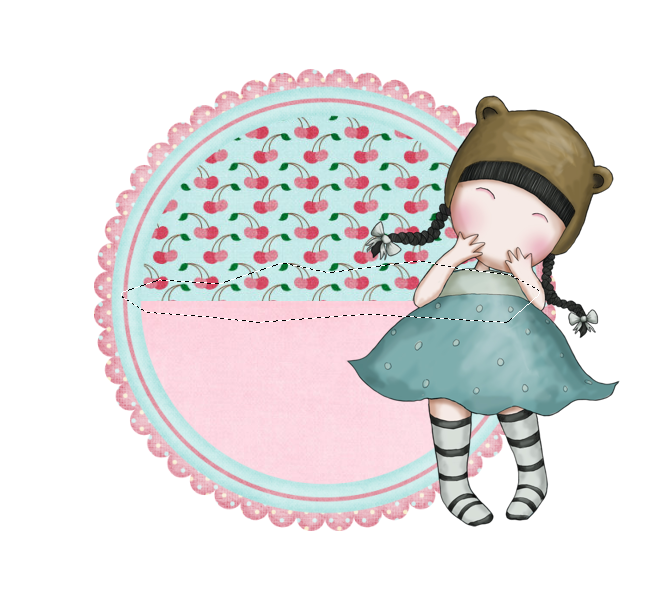
Keep Selected
then
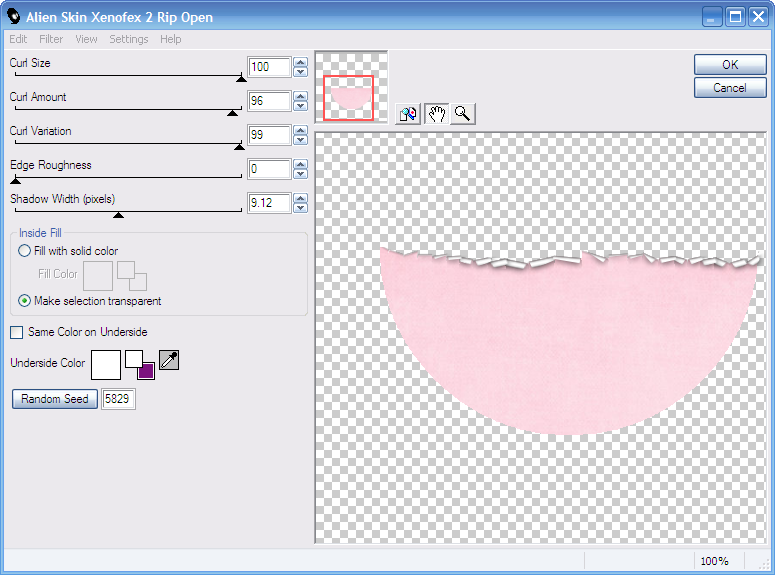
Xenofex 2 - Rip Open and apply the following settings
So now, see the gorgeous cupcakes that come with this kit?
We're going to stuff our pink paper pocket with cakes! :D
Choose which you'd like to go with the tube you're using
Resize the cakes 50% or so, make them different sizes if prefered
then
C&P
Move down the LP so they're below the Pink Paper layer
and place as liked
Once happy with placement of the cakes
Apply a dropshadow of your choice to them to give some depth
I used 0, 0, 40.00, 10.00, Black
Then, open paperflower3
C&P
Then
Go to Mura Meister Copies - look for the Encircle Preset
and change the X and Y Sliders to 70 each
Apply
Open paperflower6
C&P
Image Free Rotate, 90 degrees to the right
then move this flower - over the tag canvas so it's lined up with
the pink flower on the middle of the left side
Move down the LP so it's below it
Duplicate
Image
Mirror
Line up on the right side
Duplicate this flower on the right
Image
Free Rotate, LEFT, 90 Degrees
And place as mine under the top central flower
Duplicate this one
Image
Flip
Now
Open a chosen paper to go with your tag so far - I used Paper11
Don't Resize this one
just C&P
then
Crop to canvas size 650 x 600 tick crop tool
Make sure the paper is just above the white background
then
Take your mask of choice - a rectangle shaped dimension one would be best, and then apply
Layers, Merge, Merge Group
Now open your chosen tube
C&P
Place as liked
Add effects as liked and shadow as prefered :)
Now on the flowers and frame layer
Apply a dropshadow as liked
I used the same one I did for the cupcakes earlier
Open scatterswirl2
Image
Resize 60%
C&P
Now
Line this swirl up with the top right area of the mask layer
See my tag for reference
Now
Move the swirls down the LP to just above the Mask Layer
Duplicate
Image
Flip
Image
Mirror
Now merge these two layers together
and apply a subtle shadow
I used
2
0
16
1.98
Black
Add your name in a colour and font of choice
Apply a Bevel or (as I did) a SuperBladePro preset
and
Shadow as before
Apply any other bits you might like to use - I added some sparkles which I love at the moment, am obsessed with sparkles lol!
Now, add your artist info
and Crop the tag canvas
I got down to
623 x 546
Then
Delete the White Background
and
save your work as a PNG file - so it's transparent backed
and when posting in your forums, will not have a white background :)
Hope you enjoyed this simple, copy and paste tut - simple, maybe...but effective? I think so hehe xx
This tutorial was written on 1st October 2010 by Vix
All of my tutorials are registered with TWI