SUPPLIES NEEDED
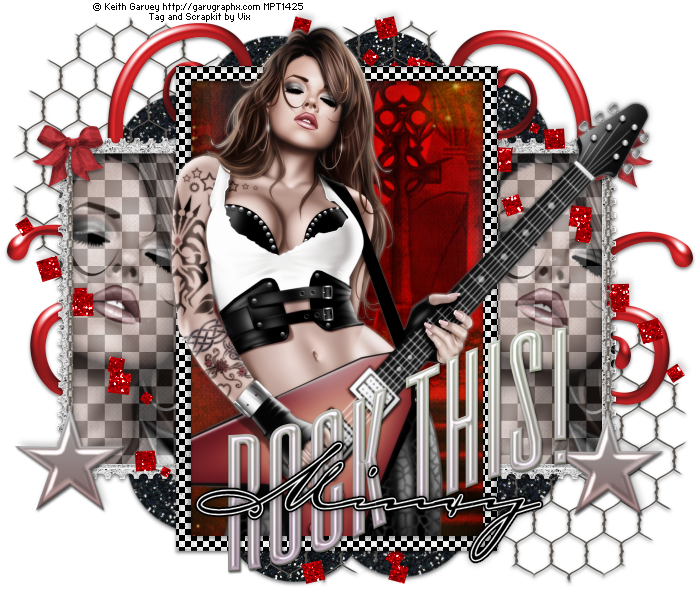
Tube/Images of Choice - I'm using Rocker by Keith Garvey...love it!
You must buy Keith's work if you wish to use it in PSP tags - so go HERE for more details
But of course, feel free to use whatever tube/images you like
Scrapkit - by er..me :) It's called "Hallo-Rockin'-We'en"
it from Clarey's store HERE
and it's now a freebie FTU kit - go HERE
Xero Graphics Greytinter
That's it!
_______________________________
Open a New Image in PSP - 700 pixels wide by 600 pixels high 72.00 pixels/inch resolution
Add New layer
Floodfill White
Right, now for the good stuff
Open FrameChequeredPlain
C&P
Image, Free Rotate, Right 90
Open GlitterFrame
C&P
Move down the LP so it's under the first frame
Open Paper14 (the red altar)
Image Resize 86% SS
C&P
Line up under the chequered frame but above the glittered one
and position as liked within - I had the altar slightly off to the right
then
Do a Selection Delete to remove the excess paper, with an expand of 6
Open Image 4 - (Chequered)
Resize as before
C&P
Place under the glitter frame layer in the LP
And repeat the Selection Delete
Open your tube now
Position as liked above all the other layers
Once happy with position, duplicate
and on the top copy
Adjust, Blur, BLUR MORE - aha!! You thought I was gonna say Gaussian?!?!!! hehe
Nope, for this, we just want blurred detail - So it's Adjust, Blur, Blur More
then on the bottom tube layer
Xero Graphics - Greytinter and change the Overall Tint slider to 85
Apply
then
on the top tube layer
Change the Blend Mode to Overlay or Soft Light - whichever you prefer
I used Soft Light
Now right click on the Tinted tube in the LP - and choose View, Current Only
Unhide the tube above, then click on the tinted layer again and
and choose Merge, Merge Visible
then
Right click on it again and choose View, All
Now, if you want you tube to look neatly
tucked into the frame in parts...read on, if not - skip to *
OK, so duplicate the tube layer
and move one layer down below the Chequered frame layer
Hide the top tube layer
Take Eraser on my hard settings - See Glossary of Terms over on the right
for good eraser settings
and all I did was erase part of the guitar wing.
But if you're using a different tube, see if there's a bit of it you want to erase
for it to look like it's emerging from the frame
Once you've erased, unhide the top tube
and I repeated the erase of the guitar wing - so it looks like it's tucked "in" the frame
and I also
got rid of the bottom edge of her legs and the guitar so again, it looks neatly tucked into the frame
BUT this is something I love to do, if you are happy with your tube as it is - well, then don't do any of the erasing part lol!!
*OK
Open your large tube image
C&P
Position on the left of the tag under the glitter frame layer
Then
Duplicate
BUT don't Image Mirror
Just
Move the duplicated one over to the right
(See my tag for ref)
and then
once happy with placement, do a Selection Delete for these two layers
with an Expansion of 6 like before
Then
Crop the tag now to get rid of excess image tube - I had loads overhanging the canvas lol!
Once you've cropped, Image, Canvas Size and put it back to 700 x 600
You'll need to floodfill the White background layer again
OK
Now
Apply Greytinter as before to the two image layers
and drop the Opacity of the layers to 75
Open the Red Bow (Bow3) from my Elements folder
Resize 20% SS
C&P
Place as mine on the left of the tag
Image
Duplicate
Image
Mirror
and move down below the two main tube layers
Open the CharmonaChain-Star
Resize 80% SS
C&P
Place as mine on the left
Duplicate
But don't mirror
just move over so it's under the right hand side bow
Open the TagBack3 - the Black Glitter one
C&P
Place just above the White Background layer in the LP
Open DoodleGelSwirlRed
C&P
Place on the left as mine
then
Image
Duplicate
Image
Mirror
Open the WireHeart
C&P
Place as Mine top left of tag (just above the Black Glitter back in the LP but below the Doodles)
Duplicate
Image
Mirror
Image
Flip
Open GlitterScatterRed from the Wordart folder
C&P
Position as mine Top right of the tag canvas
and move below the tubes and first frame and fill in the LP
Duplicate
Image
Mirror
Image
Flip
Open the Rock This wordart
C&P
Place as prefered on the tag canvas, see mine for ref
Now then, onto Shadows...
For the Glitter Scatters - Minus 4, 3, 18, 8.00 Black
Same for the CharmsonaChain-Stars
For the Bows - 2, 0, 50, 5.00 Black
Same for DoodleSwirls, ChickenWireHearts, GlitterBack,
and Both frame layers
Wordart is already shadowed so don't re-shadow
and
for the main tube layer - apply a favourite tube of choice if liked
OK
So now, add your name as liked
And your artist info
and
then
Crop once more if liked, then delete the White Background
layer and save as a PNG.
Enjoy!! xx
This tutorial was written 6th October 2010.