Tube of Choice - I'm using a beautiful one from the artwork of Anne Stokes
www.annestokes.com
Scrapkit - a fantastic freebie by Jessica @ Gothic Inspirations called "Life's Blood"
Xenofex 1 Constellation
(not the very popular Xenofex 2, but the earlier version called Xenofex 1)
Fonts of your choice
_____________________________________
The Usual - EXCEPT, if able/allowed in your forum,
650 wide by 600 height
I did for my example, so if you stick to 600 x 600 then adjust the following
resizes as needed xx
Open Parchment
C&P
Place centrally if your paste hasn't already
Open your tube
Keep Large
C&P
Move over to the left of the parchment layer
Apply a favorite dropshadow to your tube
then
Click outside the Parchment with Magic Wand on
0 Tolerance and 4 FEATHER - yeah, I know, Feather for once lol!
Then
On the tube layer, hit Delete 3 or 4 times
Selections NONE
and on the tube layer
Change the Blend Mode to Screen/Overlay/Multiply/Hard Light or similar
(When you change the Blend mode, watch the edges of the tube
effect, and choose one that "blends" nicely at the edges of the Parchment layer -
or if you like the effect but it takes the tube right up to the edges, use a soft
eraser setting and erase sections of the tube and blend it)
I had mine on Hard Light and blended it - see below for my eraser settings
Now, open the Parchment Cluster
C&P
Place it over the other layers, and line it up exactly on the right side
so it matches the Parchment
layer and sandwiches the tube in between :)
Now, take your Eraser tool on a nice blending setting
Something like Size 140, Hardness 23, Step 5, Density 77, Thickness 100, Rotation 0 and Opacity 36
and
then, Erase the Parts of the Parchment Cluster that compliment the tube placement
You'll also need to erase (if you placed your tube as mine)
the wire on the top of the parchment cluster layer, but you
can leave the one on the right
Right,
Now Paste your tube again and
Image, Resize 80%
C&P
Move it over to the right of the parchment layers
Hide for now
Open the Frame Black
Image, Resize 50%
C&P
Move over to the Top right area of the Parchment layers area
(See mine for ref)
and make sure it's above the other layers
Now, change your Magic Wand to 0 Tolerance and 0 Feather
Click inside the Frame
and do a Selection Delete with an expand of 4
on the smaller tube
Selections Invert
Add a New Layer under the smaller tube layer
and floodfill Black or a colour to suit the tag
Selections None
Open the Candle
Image, Resize 50%
C&P
Place as mine to the left of the tag
Open the Casket
Image, Resize 60%
C&P
Place as mine
Open the Keys
Image, Resize 40%
C&P
Place lined up with the black frame as I've done
Open the Grunge Tagback
Image, Resize 80%
C&P
Move down the Layer Palette under all the other layers
Place as mine
Open the Rose
Image, Resize 20%
C&P
Place as mine
Now
Apply the following dropshadow to all the element layers
EXCEPT the Parchment Cluster (the layer with the skulls)
and none of the tube layers
Dropshadow 2, 2, 45.00, 5.00 Black
Now crop the tag canvas - I managed to get down to 630 x 550
and
now add your name and any phrase you may want to add
I used "Forgiveness is the Key..."
and...well, my name, obviously lol!
Add your copyright info and
any other info you may need
Optional - If liked,
Duplicate your Parchment Cluster layer
and on the top copy
Apply Xenofex 1
Constellation on these settings...
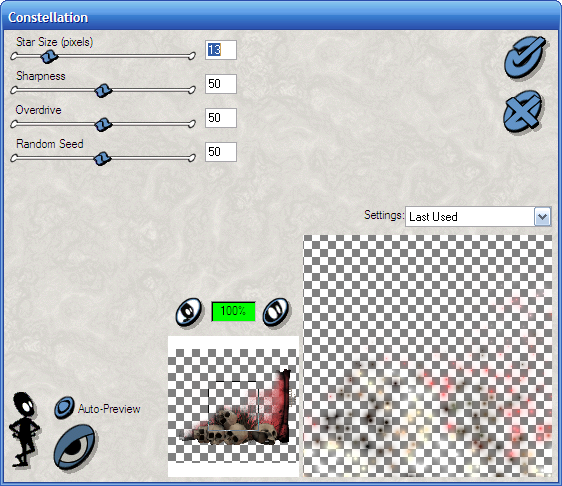
And you'll see it change on your tag, just adds a nice little touch :)
I've used this effect my own tags for years, and love it hehe xx
If it's too much, erase some of the effect with your eraser tool again.
Now,
Delete the White Background
and
save your work as a transparent PNG
Thanks for looking and if you have a go,
enjoy your tag :) xx