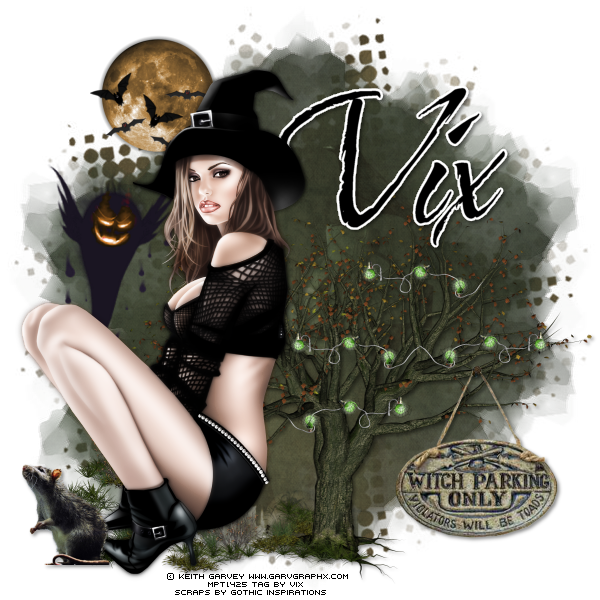
Tube of your Choice - I'm using one of my absolute favourites
from a couple of Hallowe'ens ago - it's Tabitha by the wonderful
Keith Garvey
His work is PTU and can be obtained via MPT
Scrapkit - I'm using a gorgeous PTU kit called "Eerie Hauntings" by
Jessica @ Gothic Inspirations - thank you hunny xx
Masks - Chelle's WSL_Mask220 and my mask Vix_Mask147
Both are freely available from our respective tutorial sites :)
Eye Candy 4000 Gradient Glow
Font of Choice
______________________
The Usual
then
Open Paper 4
Image, Resize, 71%
C&P
then
using Crop Tool - crop to the canvas size 600 x 600
then
Apply Chelle's mask WSL_220
Layers, Merge Group
Open Paper 6
C&P
and repeat the above steps
Make sure this mask layer is above the first one
and now either Drop the Opacity on the 2nd mask layer to about
59 or
change the Blend Mode to Overlay
then (optional)
Open Paper 7
Same as before but this time
apply my mask Vix_Mask147
and
move this masked layer below all the others
apart from the White Background
Open the MoonWBats
Image, Resize, 35%
C&P
Place as mine
Open Tree2
C&P
You'll see it over hangs the current canvas size so
Select the small clumps of grass that you
can see are seperate from the main tree
using your Selection Tool on Freehand (Lasso) Point to Point
Select around them
and then Edit, CUT
and you'll see them disappear
Edit, PASTE
and there they are again :)
So, now you can move the tree into position
and not lose any of the cool grass clumps or have
to resize the tree
Move into position as mine
Open the Witches Sign
Image, Resize 50%
C&P
Place as if nailed to the tree as mine
Open your Chosen tube now
C&P
Place as liked
and finish with an effect or dropshadow of your choice
Now
Dropshadow all the elements except
the mask layers
I used 2, 2, 45, 5.00 Black
Open the Bulbs
Image, Resize 20%
C&P
and place on the tree
Duplicate
Image
Mirror
and line up as mine
Duplicate the ones you just duplicated
and move this set up the tree
then duplicate the first ones
and move this set down the tree loL!
Don't dropshadow these
and Tip: take your eraser tool on a small, soft setting
and "blend" the edges of the single string of bulbs string into the tree more
Optional - open the cute wee rat - a raaaaat lol!
And resize 30% and C&P if you'd like
Shadow as before
Open Ghost1
Image, Resize 70%
C&P
Place as mine
Now take your chosen font
Black fill and no stroke
and then
add a Gradient Glow finish of your choice if liked
and dropshadow as before
Crop the canvas now
and
save as a transparent .PNG file
Thanks for looking
and
if you do the tut - enjoy! xx